Bees are vital to our ecosystem, playing an indispensable role as pollinators for countless plants, including many of the crops we rely on for food.
However, sometimes these industrious insects decide to build their homes in inconvenient or even dangerous locations for humans, such as within the walls of a house, a chimney, or a shed.
When this happens, simply eradicating them is not only harmful to the environment but can also lead to further problems, like rotting honey and attracting other pests.
The responsible and humane solution is to learn how to relocate bees from a hive?
Relocating a beehive, whether it’s a wild colony or an established managed hive, is a delicate operation that requires careful planning, the right equipment, and a deep understanding of bee behavior.
 It’s a task that can be incredibly rewarding, ensuring the safety of both the bees and the people involved.
This comprehensive guide will walk you through the various methods and essential steps for successful bee relocation, offering practical advice to ensure a safe and effective outcome for everyone.
Understanding Bee Behavior Before Relocation
Before attempting any relocation, it’s crucial to understand the fascinating and complex social structures and behaviors of honey bees.
This knowledge will not only help you anticipate their reactions but also choose the most effective and humane relocation method.
 ### Why Bees Relocate Naturally (Swarming)
One of the most common reasons bees “relocate” on their own is through a process called swarming. Swarming is the natural method of reproduction for honey bee colonies.
When a hive becomes too crowded, or the queen’s pheromone production declines, about half of the worker bees, along with the old queen, will leave the original hive to find a new home.
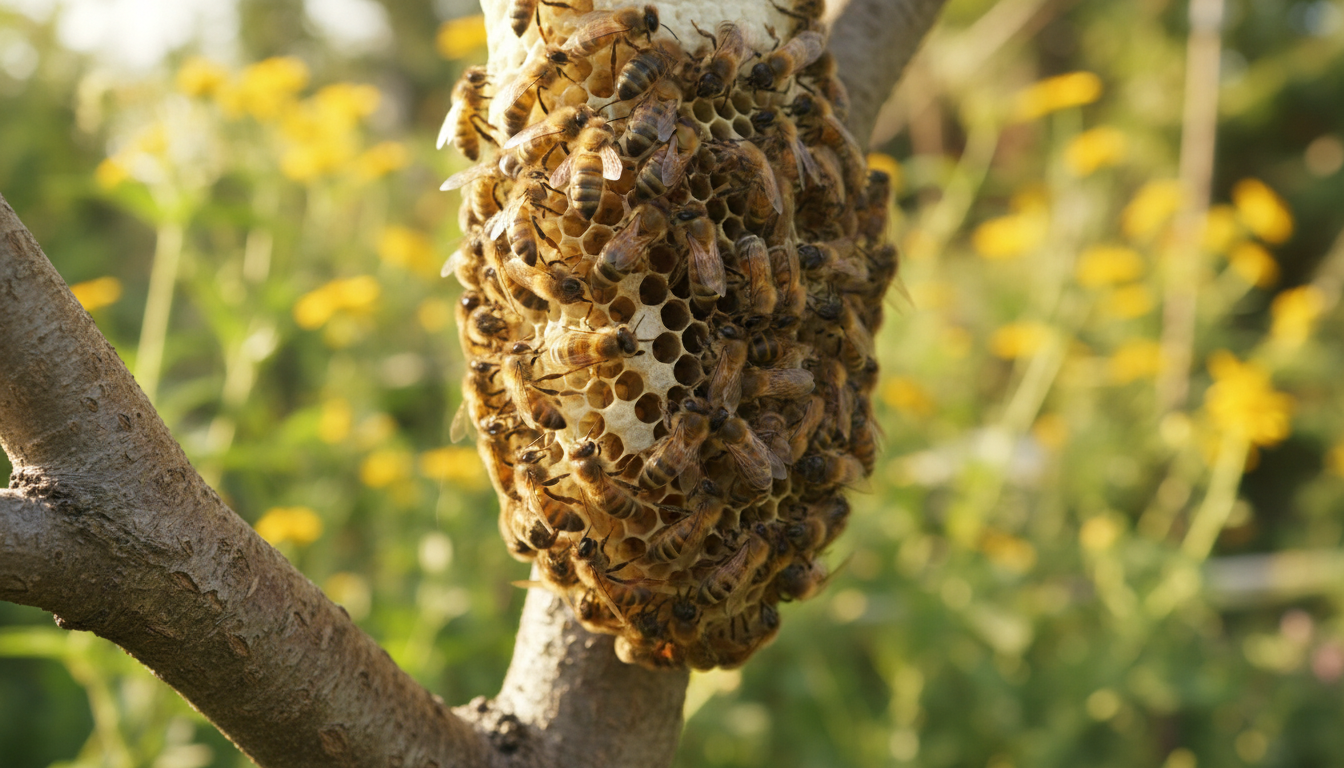
This cluster of bees, often seen hanging from a tree branch or a fence post, is called a swarm.
Swarms are generally docile because they have no hive to defend and are gorged on honey for their journey.
They are actively looking for a new cavity to establish a permanent residence. Capturing a swarm is often the easiest and safest form of bee relocation.
The Importance of the Queen Bee in Relocation
The queen bee is the heart of the colony. She is the mother of all the bees in the hive, and her presence is paramount for the colony’s survival and cohesion.
When relocating bees, the primary goal, regardless of the method, is to ensure the queen is moved to the new location.
If the queen is successfully moved, the worker bees will almost always follow her. Without a queen, a colony will either fail or attempt to raise a new one, which can be a risky and time-consuming process.
Identifying Different Types of Bee Nests
It’s critical to correctly identify the type of insect you are dealing with before attempting relocation.
Many people confuse honey bees with wasps, hornets, or yellow jackets. While all are pollinators to some extent, their behaviors and nesting habits differ significantly, and relocation methods for honey bees are not suitable for other stinging insects.
- Honey Bees: Typically fuzzy, brownish-yellow, and collect pollen in “pollen baskets” on their hind legs. Their nests are made of hexagonal wax comb, used for storing honey and raising brood. They are generally less aggressive unless their hive is directly threatened.
- Wasps/Hornets/Yellow Jackets: Often sleeker, brighter yellow and black, and less hairy. Their nests are typically made of papery pulp (wasps/hornets) or underground (yellow jackets). They are carnivorous and can be much more aggressive, stinging repeatedly without provocation.
If you are unsure, it’s always best to consult with a local beekeeper or pest control expert who specializes in bee removal.
This guide focuses exclusively on honey bee relocation.
Best Time of Year and Day for Relocation
Timing is crucial for successful bee relocation.
- Time of Year: The best time to relocate bees is typically in the spring or early summer. During these seasons, colonies are growing, resources are abundant, and bees have ample time to establish themselves in a new location before the colder months arrive. Relocating in late fall or winter can be detrimental as bees need time to build up honey stores for survival.
- Time of Day: The ideal time of day to physically move a hive or perform a cut-out is late evening or early morning, when most of the foraging bees have returned to the hive. This minimizes the number of bees left behind at the old site and ensures the entire colony is together for the move. For short-distance moves, this timing is less critical as bees will reorient.
Safety First: Essential Gear and Precautions
Relocating bees, even docile ones, carries the risk of stings. Proper preparation and safety measures are non-negotiable.
Personal Protective Equipment (PPE)
Investing in good quality PPE is paramount for your safety and confidence.
- Full Bee Suit: A one-piece suit that covers your entire body, preferably light-colored (bees are less provoked by light colors). Ensure it’s thick enough to prevent stings.
- Bee Veil: Integrated into the suit or a separate hood, this protects your face and neck. Ensure the mesh is clear and allows good visibility.
- Gloves: Long, thick gloves (often leather or synthetic) that extend past your wrists, overlapping with the sleeves of your suit.
- Closed-Toe Shoes/Boots: Sturdy footwear that covers your ankles. Tuck your pant legs into your boots or secure them with elastic bands to prevent bees from crawling up.
- Smoker: An essential tool. Smoke calms bees by masking their alarm pheromones and causing them to gorge on honey, making them less inclined to sting. Use natural fuel like pine needles, wood shavings, or cotton.
- First Aid Kit: Always have an epinephrine auto-injector (EpiPen) available if you or anyone assisting is allergic to bee stings. Even if not allergic, have antihistamines and sting relief cream on hand.
Tools for the Job
Beyond PPE, you’ll need specific tools for the relocation process:
- Hive Tool: A metal pry bar used to separate hive components, scrape propolis, and lift frames.
- Bee Brush or Feather: For gently brushing bees off frames or surfaces without harming them.
- Container for Relocation:
- Nuc Box (Nucleus Hive): A small, temporary hive designed to hold 3-5 frames. Ideal for capturing swarms or holding comb during cut-outs.
- Cardboard Box: A sturdy cardboard box can be used for temporary swarm capture, but ensure it has ventilation.
- Full-Sized Hive Box: If you are moving an existing hive, you’ll need a new or existing hive body.
- Frames (with or without foundation): To secure comb from a cut-out or to provide a new home for a swarm.
- Rubber Bands: For securing pieces of natural comb into empty frames during a cut-out.
- Sugar Water Spray: A spray bottle filled with a 1:1 sugar water solution can be used to gently mist bees, making them less flighty and easier to manage.
- Duct Tape or Straps: To secure hive components during transport.
- Lighting (Red Headlamp): Bees cannot see red light, making a red headlamp ideal for working at night without disturbing them.
Planning and Site Preparation
Thorough planning is crucial for a smooth relocation.
- New Hive Location: Identify a suitable permanent location for the bees. It should be away from high-traffic areas, have good sun exposure (morning sun, afternoon shade), access to water, and proximity to flowering plants. Ensure it’s legal and permissible in your area.
- Clear Path: Plan your route from the old site to the new, ensuring it’s clear of obstacles.
- Notify Neighbors: If you are relocating bees from your property, inform your neighbors, especially if they are close by. If you are relocating from someone else’s property, ensure they are fully informed and have given consent.
- Have Assistance: Never attempt a complex bee relocation alone. Have at least one assistant who is also properly geared and understands their role.
When to Call a Professional
While this guide provides comprehensive information, some situations warrant calling a professional beekeeper or bee removal specialist:
- Aggressive Bees: If the bees exhibit unusual aggression.
- Difficult Locations: Colonies established within difficult-to-access areas like chimneys, inside walls, or high up in trees. These often require specialized tools and expertise to extract without causing structural damage or harming the bees.
- Large, Established Colonies: Very large colonies that have been in a location for years can be complex to move due to the sheer volume of bees and comb.
- Lack of Confidence/Experience: If you are not confident in your ability to perform the relocation safely and effectively.
Professional bee removers have the experience, tools, and insurance to handle challenging situations.
Step-by-Step Methods for Relocating Bees
The method you choose depends on the specific situation: whether you’re moving a managed hive, capturing a swarm, or removing bees from a structure.
Method 1: Relocating an Established Hive (Short Distance)
Moving a managed beehive a short distance (less than 2-3 miles) presents a unique challenge because foraging bees will instinctively try to return to their original location.
This can lead to lost bees and a weakened colony.
- The “Two-Foot Rule” or “Three-Foot Rule”: Bees are excellent navigators. If you move a hive a very short distance (e.g., a few feet), they will reorient themselves without much issue. However, if you move it beyond this small radius but still within their foraging range, they will fly back to the original spot.
- Gradual Movement Over Several Days/Weeks:
- Initial Move: Move the hive only 1-2 feet each day or every other day, preferably in the late evening or early morning when bees are inside.
- Obstacle Placement: After each small move, place a temporary obstacle (like a large branch, a piece of plywood, or a wheelbarrow) directly in front of the hive entrance. This forces the bees to reorient themselves and take note of the new entrance position.
- Monitor: Observe the bees. If they are confused and circling the old spot, you’ve moved them too far too quickly. Place them back a bit and slow down the pace.
- Continue: Repeat this process until the hive reaches its desired short-distance location. This method can take several days to a few weeks depending on the total distance.
Method 2: Relocating an Established Hive (Long Distance)
For moves greater than 2-3 miles, bees will typically reorient to the new location without needing the gradual movement method.
This is because they are entirely outside their familiar foraging territory.
- Preparation (Day Before):
- Reduce Entrance: If the hive entrance is wide, reduce it to a smaller opening to make securing easier.
- Ensure Ventilation: Prepare screen tops or entrance screens to allow airflow during transport without letting bees escape.
- Timing (Night Before or Early Morning): All bees must be inside the hive. Wait until dusk or before dawn when foraging activity has ceased.
- Secure the Hive:
- Seal Entrances: Use foam, duct tape, or entrance screens to completely block all hive entrances.
- Strap Components: Use ratchet straps or heavy-duty hive straps to secure all hive bodies, supers, and the lid together. This prevents them from shifting or falling apart during transit.
- Transportation:
- Lift Safely: Be mindful of the weight. Hives can be very heavy, especially if full of honey. Use proper lifting techniques or get help.
- Vehicle Placement: Place the secured hive in a truck bed, trailer, or car trunk. Ensure it’s stable and won’t tip over. Place it entrance-side up if possible, or ensure good ventilation if laid on its side.
- Ventilation: Good airflow is critical, especially on warm days. Overheating can kill a colony.
- Minimize Bumps: Drive carefully to minimize jarring.
- Arrival at New Site:
- Placement: Position the hive in its new, pre-prepared location.
- Unstrap and Unseal: Carefully remove the straps and then unseal the entrance.
- Reorientation: The bees will immediately begin their reorientation flights, marking their new home.
- Feed (Optional): Offer sugar syrup if resources are scarce or if the colony seems stressed.
Method 3: Capturing and Relocating a Swarm
Capturing a swarm is often the simplest and most bee-friendly way to relocate bees, as they are usually calm and looking for a new home.
- Identify the Swarm: Swarms appear as a large cluster of bees, often hanging from a tree branch, bush, or other object. They are usually docile.
- Gather Tools: You’ll need a nuc box or a sturdy cardboard box with a lid, a bee brush or feather, a smoker (optional, as swarms are usually calm), and potentially a ladder or branch cutters.
- Position the Container: Place the nuc box or cardboard box directly beneath or as close as possible to the swarm. If using a nuc box, ensure it contains a few frames, ideally one with some drawn comb or an old frame with foundation to entice them.
- Shake or Brush:
- If on a Branch: With a quick, sharp shake, dislodge the entire swarm directly into the container. The goal is to get the queen into the box.
- If on a Flat Surface: Gently brush the bees into the container.
- Wait for the Queen: Once most bees are in the box, wait. If the queen is inside, the remaining bees will march into the box to join her. If the bees start to cluster outside the box again, the queen might still be outside, and you’ll need to repeat the shaking/brushing.
- Secure the Swarm: Once most bees are inside, gently close the lid. Leave a small opening for any late returners.
- Transport: Wait until dusk to ensure all stragglers have entered. Then, transport the box to its new, permanent hive location. Place the bees into their new hive by shaking them out or letting them walk in.
- Post-Swarm Care: Provide sugar syrup to help them establish their new home and start drawing comb.
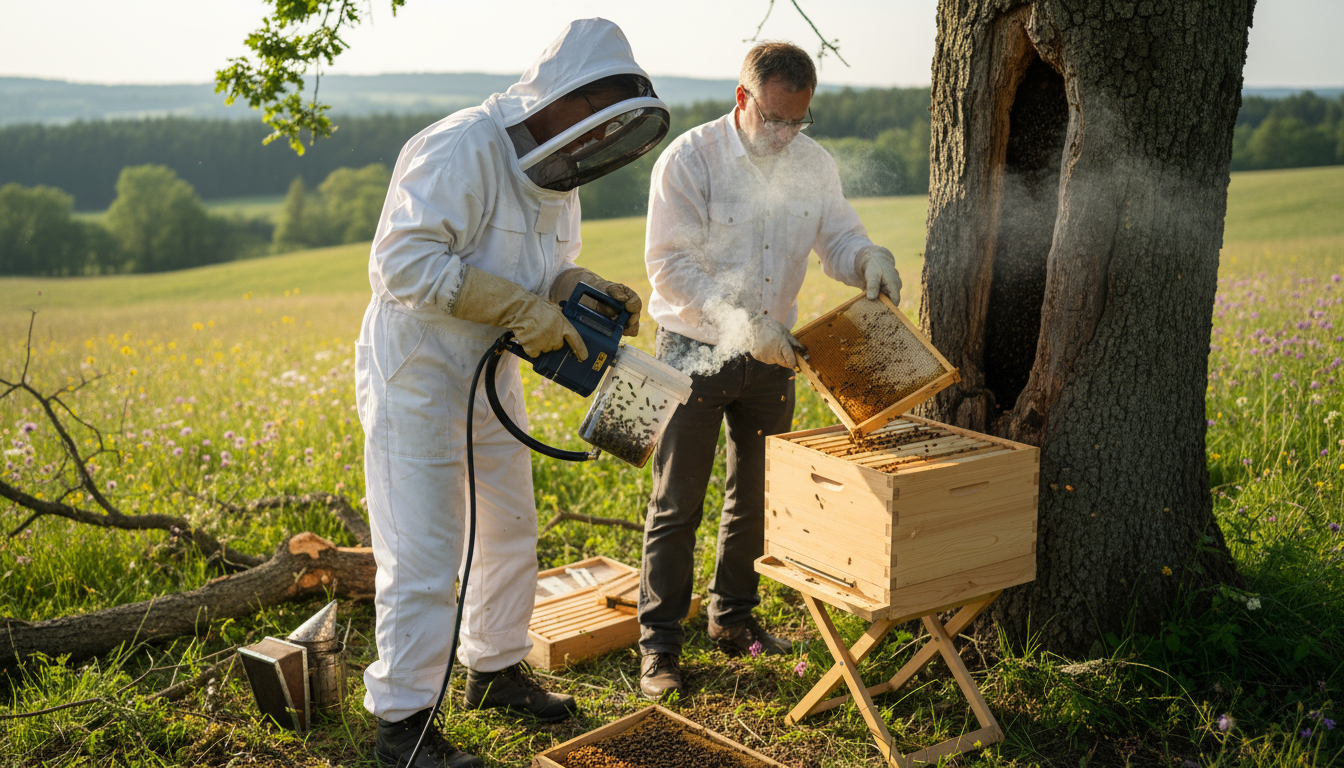
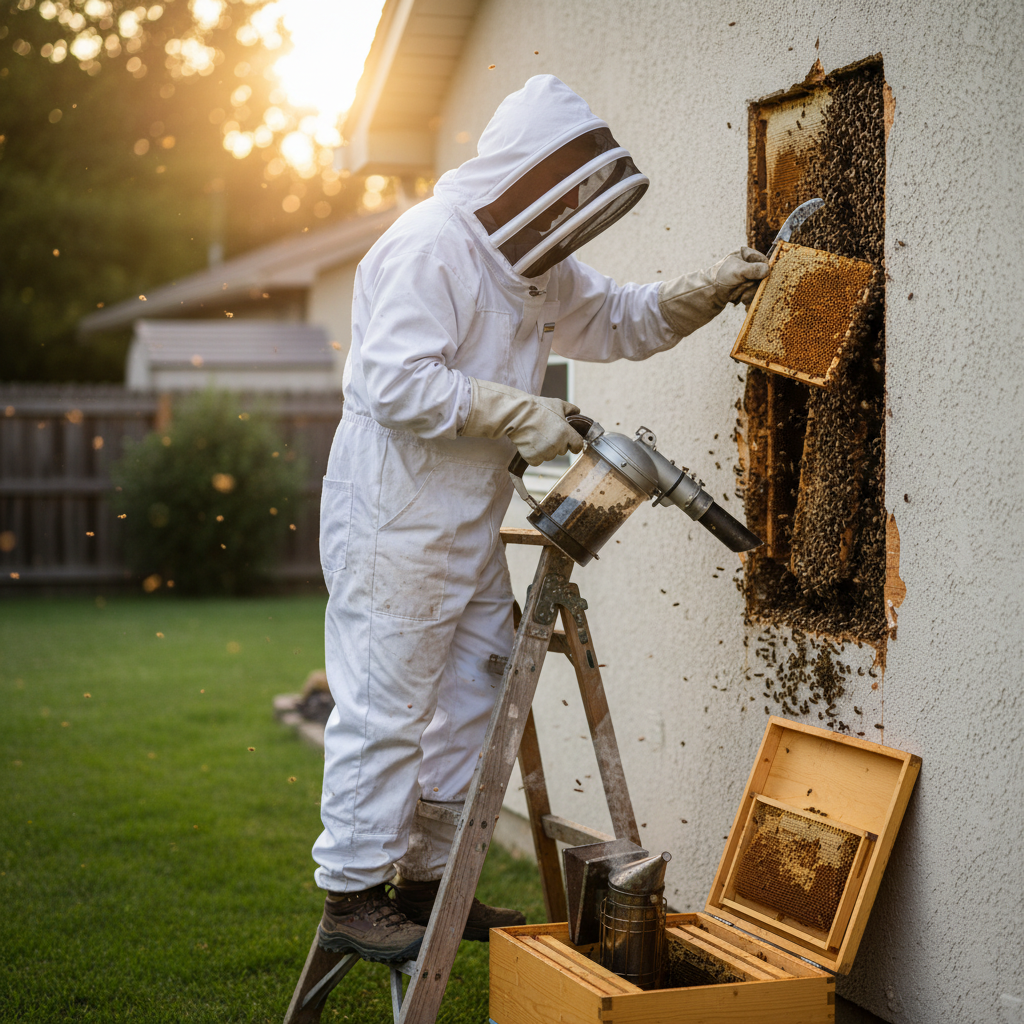
Method 4: Performing a Cut-Out (Removing Bees from a Structure)
A cut-out is necessary when bees have built their comb inside a wall, chimney, tree cavity, or other inaccessible structure. This is the most labor-intensive and invasive method.
- Planning and Reconnaissance:
- Locate the Colony: Determine the exact location and size of the colony within the structure using thermal imaging, listening for buzzing, or observing entry/exit points.
- Access Points: Plan how to safely open the structure (e.g., removing siding, drywall, chimney bricks).
- Entry/Exit: Observe where the bees are entering and exiting.
- Gather Specialized Tools: In addition to standard bee tools, you might need:
- Saws, pry bars, hammers, drills (for opening the structure).
- A bee vacuum (bee vac): A specialized low-suction vacuum designed to gently collect bees without harming them. Do NOT use a regular household vacuum.
- Empty frames, rubber bands.
- Large buckets or containers for comb.
- The Process (Typically Done During the Day):
- Open the Structure: Carefully and slowly open the part of the structure where the bees are located. Work gently to avoid crushing bees or damaging comb.
- Smoke: Use your smoker to keep bees calm.
- Remove Comb: Systematically remove sections of comb.
- Brood Comb: This is the most critical. Carefully cut out sections of brood comb and secure them into empty frames using rubber bands. These frames will form the core of the new hive.
- Honey Comb: Cut out honey comb. If clean, it can be given to the bees in their new hive or harvested.
- Pollen Comb: Cut out pollen comb and place it in the new hive if possible.
- Locate the Queen: The most crucial step. Once found, gently place the queen into one of the frames with brood in the new hive box. If you can’t find her, try to ensure at least one frame with fresh eggs or young larvae is moved, as the bees can raise a new queen from these.
- Vacuum Remaining Bees: Use the bee vac to gently collect the majority of the remaining worker bees. Transfer these bees into the new hive box.
- Seal the Old Entry Point: This is CRITICAL. Once all bees and comb are removed, thoroughly seal off all entry points to the old cavity. If not sealed, new swarms may be attracted by the residual scent of honey and wax, leading to a repeat problem.
- Clean Up: Remove any remaining honey or wax from the cavity to prevent attracting other pests.
- Post-Cut-Out Care:
- Move New Hive: Transport the new hive (with the secured comb, queen, and vacuumed bees) to its permanent location.
- Monitor Closely: The colony will be stressed. Provide sugar syrup, and monitor their acceptance of the new frames and the queen.
Method 5: Trap-Out (For Inaccessible Colonies)
A trap-out is a less invasive, but much slower, method used when a cut-out is not feasible (e.g., in a historic building or a very difficult-to-access cavity).
- When to Use: When you cannot open the structure without significant damage, or if the colony is too deep within a cavity.
- Build a One-Way Cone: Construct a cone-shaped exit made of screen or hardware cloth. The wide end is attached tightly around the bees’ main entrance/exit point on the structure, and the narrow end is left with an opening just wide enough for one bee to pass through.
- Set Up a New Hive: Place a new hive box (with frames, ideally some drawn comb) as close as possible to the cone’s exit, with its entrance directly facing the cone’s opening.
- The Process:
- Bees can exit the old cavity through the cone but cannot re-enter.
- They will then be attracted to the nearby new hive box.
- The queen remains trapped in the old cavity.
- The exiting worker bees will eventually move into the new hive and, if they have young larvae or eggs, will begin to raise a new queen.
- Patience: This process can take weeks to several months, as the old queen will continue to lay eggs, and new bees will hatch and eventually leave through the cone.
- Remove Cone and Seal: Once you are confident that the old colony has died out (no more bees are exiting) and the new colony is well-established, remove the cone and permanently seal the old entry point. It’s crucial to ensure the old colony is truly gone, as a new swarm could move in if not properly sealed.
Post-Relocation Care and Integration
Once the bees are in their new home, your job isn’t over. Proper post-relocation care is crucial for their survival and successful establishment.
Monitoring the Newly Relocated Colony
- Observe Activity: For the first few days, observe the hive entrance. You should see bees flying in and out, performing orientation flights.
- Internal Inspection (After a few days to a week): Gently open the hive to check:
- Queen Presence: Look for the queen or signs of her (eggs, young larvae). If you can’t find her, check for queen cells, indicating they might be raising a new one.
- Brood Pattern: A healthy queen lays eggs in a solid pattern.
- Food Stores: Ensure they have enough honey and pollen.
- Pest/Disease: Check for mites (Varroa) or signs of diseases.
- Stress Indicators: A stressed colony might be unusually agitated, exhibit a lack of foraging, or have a weak queen.
Feeding Bees After Relocation (Sugar Water)
Relocation is stressful and can disrupt foraging. Providing a consistent supply of sugar syrup (1:1 sugar to water ratio) for the first few weeks will help them:
- Build Comb: Provide energy for drawing out new wax comb.
- Boost Morale: Give them a sense of security and abundance.
- Support Brood Rearing: Ensure the queen has resources to lay eggs.
- Use an internal feeder or an entrance feeder, and monitor consumption.
Preventing Re-Entry to the Old Location
This is especially critical after a cut-out or trap-out.
- Seal Entry Points: Thoroughly and permanently seal all holes, cracks, and crevices where the bees gained entry into the structure. Use durable materials like caulk, cement, or wood.
- Remove Scent Cues: Clean the old cavity as much as possible to remove residual honey, wax, and propolis. These scents can attract new swarms or other pests. Consider spraying the area with an odor neutralizer or a strong-smelling repellent (like peppermint oil) for a few weeks.
What to Do If Relocation Fails
Despite best efforts, sometimes a relocation isn’t successful.
- Colony Absconds: If the bees leave the new hive entirely, they may have found a more suitable location, or the new hive wasn’t appealing (e.g., poor queen, lack of resources, pests).
- Colony Dies: This can happen due to stress, lack of a queen, starvation, or disease.
- Re-Evaluate: If failure occurs, try to understand why. Was the queen lost? Were they not fed enough? Was the new location unsuitable?
- Consult a Professional: If you encounter repeated failures, it’s wise to consult an experienced beekeeper or professional bee removal service for guidance.
Legal and Ethical Considerations
Relocating bees comes with responsibilities that extend beyond mere technique.
Local Regulations and Permits
Before you begin, check with your local municipal or county government. Some areas have specific regulations regarding:
- Beekeeping: Where hives can be placed, setback requirements from property lines.
- Pest Removal: Rules about removing wildlife from structures.
- Protected Species: While honey bees are not typically an endangered species, some regions have specific protections or require permits for certain types of removal.
- Building Codes: If you plan to open a structure, ensure you understand any relevant building codes.
Bee Conservation and Responsible Practices
- Prioritize Bee Safety: The primary goal of relocation should be the bees’ well-being. Avoid methods that are likely to harm them.
- Avoid Pesticides: Never use pesticides on honey bees. If chemicals are necessary for other pests, ensure they are bee-friendly or used in a way that doesn’t impact the bees.
- Educate Others: Help spread awareness about the importance of bees and the benefits of relocation over extermination.
The Importance of Not Harming Bees
Bees are facing numerous threats globally, including habitat loss, pesticide use, and climate change. Every healthy colony is a valuable asset to the environment. Choosing to relocate rather than exterminate directly contributes to bee conservation efforts. By learning how to relocate bees from a hive? responsibly, you become a steward of these incredible creatures.
Conclusion
Relocating bees from a hive is a multifaceted process that demands respect for these incredible insects, careful planning, and a commitment to safety.
Whether you are dealing with a wild swarm, an established colony in an undesirable location, or simply moving your own beehive, understanding the various methods from gentle swarm capture to complex cut-outs and patient trap-out is key to a successful outcome.
Remember that the well-being of the queen is paramount, and post-relocation care, including feeding and diligent monitoring, is crucial for the colony’s long-term survival.
Always prioritize safety by wearing appropriate protective gear and knowing when to call a professional. By choosing to relocate bees, you are not only resolving a potential conflict but also actively participating in the vital effort of bee conservation, helping to ensure these essential pollinators continue their work for generations to come.
Frequently Asked Questions (FAQ)
Q: Can I relocate bees myself?
A: Yes, you can relocate bees yourself, especially if you are dealing with a docile swarm. However, for established colonies inside structures (cut-outs) or very aggressive bees, it is highly recommended to seek assistance from an experienced beekeeper or professional bee removal specialist. Always prioritize safety and ensure you have the correct protective gear and tools.
Q: What time of year is best to relocate a hive?
A: The best time of year to relocate bees is typically in the spring or early summer. This allows the colony ample time to establish itself, build up resources, and prepare for the colder months. Relocating in late fall or winter can be very detrimental to the bees’ survival.
Q: How far do I need to move a hive?
A: For established hives, you generally need to move them either a very short distance (less than 2-3 feet) or a long distance (more than 2-3 miles). If you move a hive a distance between these two ranges, foraging bees will often return to the old location and become lost.
Q: What happens if I move a hive a short distance?
A: If you move a hive a short distance (e.g., 10-50 feet) but still within the bees’ familiar foraging range, most of the returning foragers will fly back to the original spot, get confused, and eventually die. To avoid this, either move the hive gradually (1-2 feet per day) or move it beyond their foraging range (over 2-3 miles).
Q: Do bees get aggressive during relocation?
A: Swarms are generally very docile because they have no hive or brood to defend. However, established colonies can become aggressive when their home is disturbed, especially during a cut-out. Proper use of a smoker, protective gear, and calm, deliberate movements can help minimize aggression.
Q: How long does it take for bees to reorient to a new hive location?
A: When moved a long distance, bees will typically reorient to their new location within a few days. They will perform “orientation flights” where they fly out from the new entrance and circle, memorizing the new surroundings. For short, gradual moves, they reorient with each small shift.
Q: What should I do if I find a swarm?
A: If you find a swarm, do not disturb it. Contact a local beekeeper or a bee club in your area immediately. Many beekeepers are eager to collect swarms as it’s a humane way to acquire new colonies. They will usually come and collect the swarm for free. If you are experienced, you can follow the steps for “Capturing and Relocating a Swarm” outlined in this article.